
White to Play
Published in Chess Puzzles
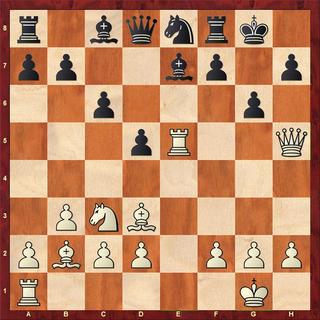
I like to call this the “should have” game as both sides made decisive mistakes. Here’s the whole game so you can appreciate the fun. Our diagrammed position, though, has the position where White did play a brilliant move. What was that, and why?
Cole - Ward [C67]London, 1898:
1.e4 e5 2.Nf3 Nc6 3.Bb5 Nf6 4.0–0 Nxe4 5.Re1 Nd6 6.Nxe5 Nxe5 7.Rxe5+ Be7 8.Bd3 0–0 9.Nc3 Ne8? [Black tries to get to f6 with his knight, but better was 9...Bf6 10.Re3 Bd4 11.Rh3 g6 12.Qg4 Qf6=]10.b3 c6 11.Bb2 d5 12.Qh5 g6 [Here, Black should have played 12...Nf6] SEE DIAGRAM 13.Nxd5!! gxh5 14.Bxh7+?? [White should have played 14.Nxe7+ Qxe7 15.Rxe7 Ng7 16.Rae1 with an overwhelming position.] 14...Kxh7?? [And now Black should not have taken the bishop. To many of us of this day, it seems like it was almost obligatory to accept all sacrifices back then! If 14...Kg7 White has no continuation of the attack, even if he tries the double check.] 15.Rxh5+ Kg6 16.Nf4# Very artistic final position in that every potential king escape square is guarded by only one piece attacking that square. 1–0
Send questions and comments to PTamburro@aol.com.