
Here's How: Make Proper Angle Cuts on Crown Molding
Dear James: I like the look of crown molding for my dining room, but I am having trouble getting the corner cut for a good fit. Is there a proper way to cut them? -- Jessica P.
Dear Jessica: Fitting the corners for crown molding is a challenge even for experienced remodelers and builders. They will fill the gaps in the corners with wood filler and sand them smooth. Over time, the filler dries out, and with humidity level changes, the corners look bad.
If you already installed the door and baseboard moldings, you probably found it easy to fit properly because they are basically rectangular in shape. They also do not draw the close attention of attractive crown moldings. Crown moldings can make the difference between a nice room and a beautiful room.
Crown moldings, by design, are basically triangular in shape. Today, in order to reduce the material requirements, they are usually undercut in the back (partially hollow). This makes it more difficult to get a good corner fit even using an accurate miter saw.
Just take a moment and think about the geometry of a triangular-shaped crown molding. Since the top of it extends out further from the wall than the bottom, the length from end to end of the top must be shorter than the bottom. You must remember this when making your saw cuts.
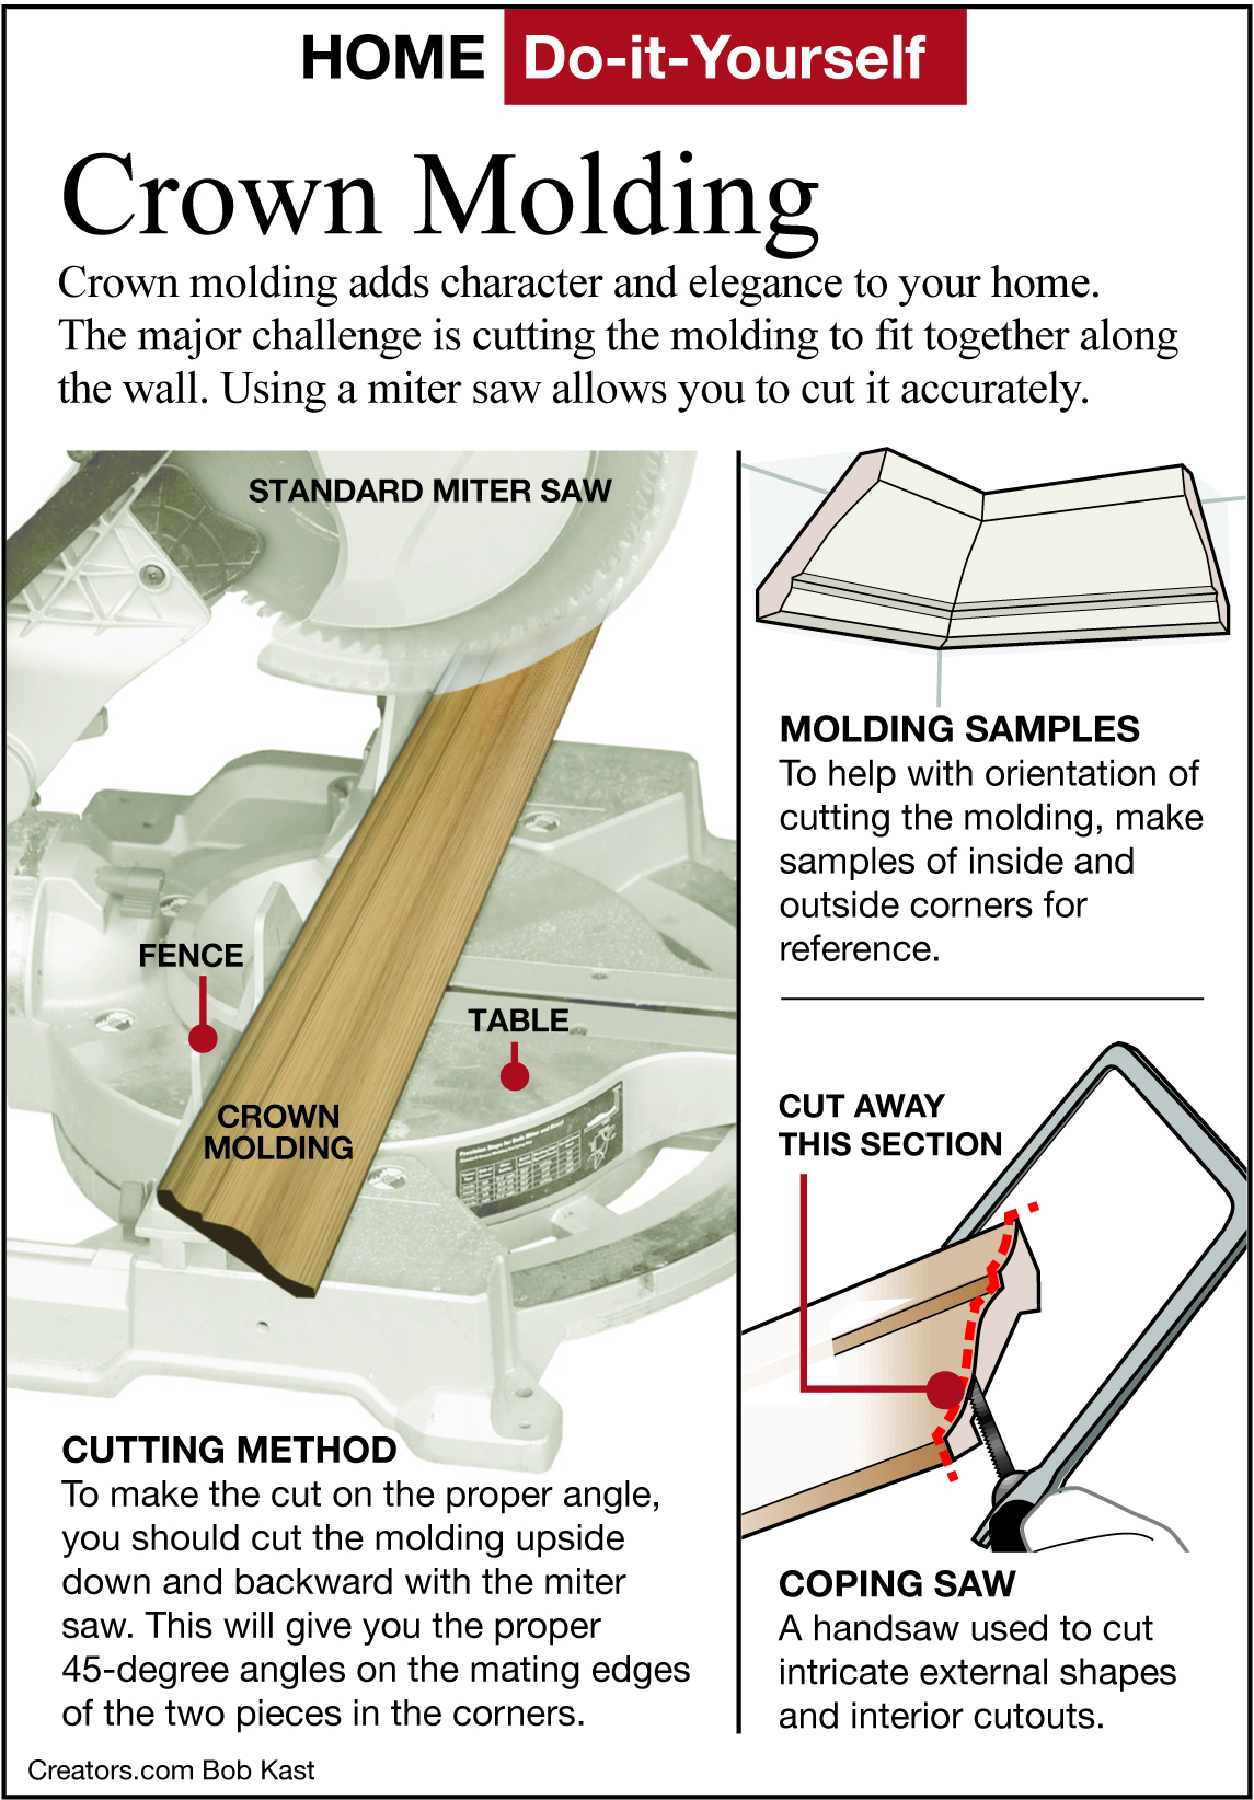
To make the cut on the proper angle, you should cut the molding upside-down and backward with the miter saw. This will give you the proper 45-degree angles on the mating edges of the two pieces in the corners.
Before you ruin much more of your expensive crown molding, and your mental health, cut two 1-foot-long practice pieces of molding. Place one piece of molding in the miter box so that the lower edge of the molding is facing upward and sloping downward from the saw fence to the base.
Adjust the blade accurately at 45 degrees and make your cut. This will produce one half of the joint. Now, repeat the identical cutting process on the other 1-foot piece with the blade positioned in the opposite direction. The two pieces should now fit together forming a perfect 90-degree corner.
Hold them up in each one of the corners in your dining room. Don't be discouraged if there is still a gap between them in some of the corners. You did nothing wrong, the original builder did. Very few rooms are perfectly rectangular, so all the corners were not exactly 90 degrees to start with.
You have two options at this point. You can use some filler if the gaps are very small or you can use a coped joint. In the past, nearly all experienced carpenters used coped joints for a truly professional-looking job. Even with seasonal weather condition changes, the joints will still look good.
A coped joint means that one piece actually fits over the other piece at the corner; therefore, the angle of the walls at the corner is not critical. This method allows you to wiggle and twist the molding just enough for a gap-free fit.
With one molding piece cut on a 45-degree angle as discussed above, use a coping saw to carefully follow the cut edge profile. Hold the coping saw on a slight angle to make sure that the edge will rest tightly against the piece of molding under it.
Cut off the end of the mating molding piece squarely (no miter). Slide this piece up into the corner and nail it in place. Place the piece with the coped end over it and nail it in place too.
========
Send your questions to Here's How, 6906 Royalgreen Dr., Cincinnati, Ohio, 45244 or visit www.dulley.com. To find out more about James Dulley and read features by other Creators Syndicate writers and cartoonists, visit the Creators Syndicate website at www.creators.com.
Copyright 2024 Creators Syndicate Inc.