Games
/Entertainment

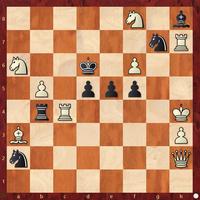
White to Play
This is a composition by a joint effort of two great American problemists: Kenneth S. Howard and Alain C. White. A Mate in Two.
View solution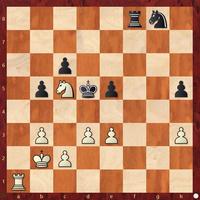
White to Play
The great Alexander Alekhin constructed a mating net in this endgame. Do you think you could conjure one up. Take the weekend…
View solution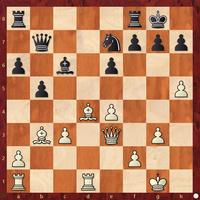
White to Play
An instructional finish from Spielmann at Carlsbad, 1929.
View solution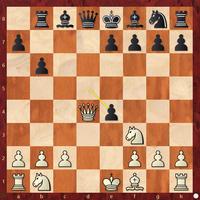
White to Play
This is a game, Alekhin – Kaufman,Odessa, 1918, which started out with 1.d4 d5 2.Nf3 c5 3.Bf4 cxd4 4.Bxb8 Rxb8 5.Qxd4 b6 (Better was 5...a6) 6.e4 dxe4 (SEE DIAGRAM) Black figured that after the queen exchange followed by 8.Ng5 Nh6 9.Nc3 e6 10.0–0–0+ Ke7 11.Ncxe4 g6 he's at least equal. He figured wrong. Where did he go wrong?
View solution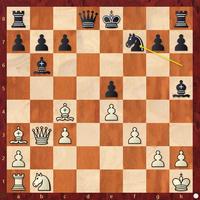
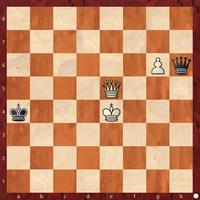
White to Play
Queen and pawn vs queen is a very tough ending. World Champ Botvinnik showed one way in 1955 to win vs. Minev. Very instructive.
View solution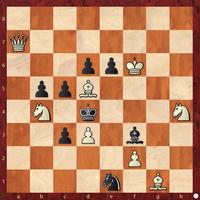
White to Play
Here is your chance to beat a world champion from the 1920s. Jose Capablaca couldn’t solve this mate in two in a contest—the only problem he could not solve.
View solution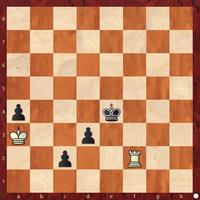
White to Play
White has a powerful rook, but Black has advanced connected passed pawns. What do you do as White?
View solution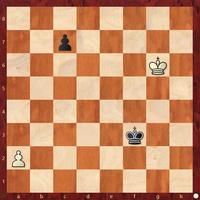
White to Play
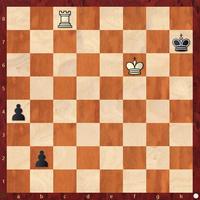
This is a Grigoriev study that demonstrates that the lone king and advanced c-pawn on c2 don’t always draw. Can you do the whole concrete calculation all the way, with the variations, to the finish?
View solution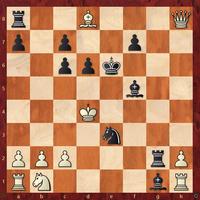
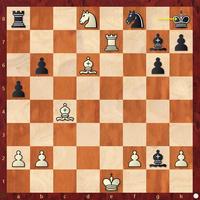
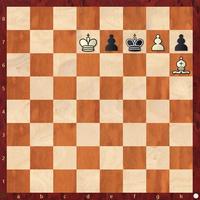
White to Play
This is a very famous problem. It’s a forced mate.
View solution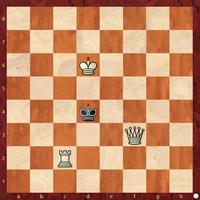
White to Play
How long would it take you to checkmate Black here?
View solution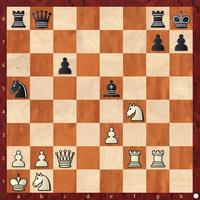
White to Play
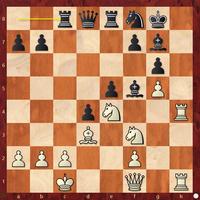
A slashing Kurt Richer attack which all chess players should remember. The game started out (40) Richter - Abramavicius [C13] Hamburg Hamburg, 1930
1.d4 Nf6 2.Nc3 d5 3.Bg5 e6 4.e4 dxe4 5.Nxe4 Be7 6.Bxf6 Bxf6 7.Nf3 Nd7 8.Bd3 0–0 9.Qe2 c5 10.0–0–0 cxd4 11.g4 g6 12.h4 Bg7 13.h5 Re8 14.hxg6 hxg6 15.g5 e5 16.Rh4 Nf8 17.Rdh1 Bf5 18.Qf1 Rc8 (SEE...
View solution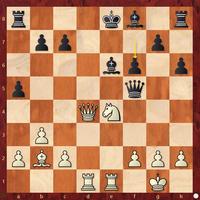
White to Play
A very interesting for opening theory game that ends rather drastically with a mating attack. It started out Pollock - Allies Buffalo, 1893
1.e4 e5 2.Nf3 Nc6 3.Bc4 Nf6 4.d4 exd4 5.0–0 Nxe4 6.Re1 d5 7.Bxd5 Qxd5 8.Nc3 Qf5 9.Nxe4 Be6 10.Nxd4 Nxd4 11.Qxd4 h6 12.b3 a6 13.Bb2 a5? 14.Rad1 f6 and White now announced mate in 5. SEE DIAGRAM
View solution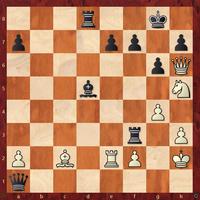
Black to Play
From an actual game—Kristev-Tringov, Skopje, 1961
View solution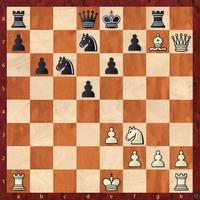
Black to Play
This game contains one of the all-time great saves in the history of chess. You are Black and in deep trouble as you can see in the diagram. What’s your plan?
View solution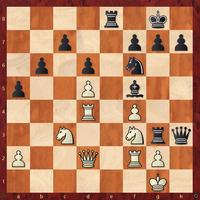
Black to Play
Steinitz polished off Chigorin in this game from their exciting match
View solutionRelated Channels
Comics