
White to Play
Published in Chess Puzzles
Summer chess school lesson 14. This one may look easy. You just put the rook behind the a-pawn and push, then bring the king over to free the rook, BUT Black isn't going to cooperate! He's going to bring his king over to help the rook. Again, the question, can you see a definite plan?
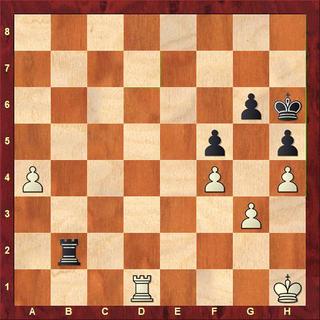
Here we go! 1.Ra1 Part I is obvious. 1...Rb6 2.a5 Ra6 Part II begins. Both kings race to the queenside. How is White to deal with that? 3.Kg2 Kg7 4.Kf3 Kf6 5.Ke3 Ke7 Trying to regain the opposition. 6.Kd4 Kd6! 7.Ra2! A waiting move that forces the black king to move since the rook can't move, allowing the pawn to advance. 7...Kc6 8.Ke5 Part III gets underway. White uses the awkward position of the black king and rook to create threats on both sides of the board. 8...Kd7 9.Ra3 Kc7 The check will just help the white king over to the queenside and release the white rook: 9...Re6+ 10.Kd5 Ra6 11.Kc5 Kc7 12.Kb5 Kb7 13.Re3 10.Rc3+ No matter what, the white rook gets to the fifth rank, which gives Black more trouble. 10...Kd7 11.Rd3+ Kc7 12.Rd5 Once the king is established on e5, the white rook can now threaten to exchange rooks and lose the a-pawn while gobbling up the kingside. 12...Rc6 13.Kd4 Re6 Avoiding the exchange. 14.Re5 Rd6+ 15.Kc4 Ra6 16.Rc5+ Kb7 16...Kd6 17.Kb4! (You always have to be alert: 17.Kb5?? Rxa5+ and Black wins!!) 17...Kd7 18.Kb5 17.Kd5 Kb8 18.Kd4 Kb7 19.Kc4 Ka7 20.Kb5 By forcing the black king over to the queenside, White now switches protectors of the a-pawn. This is bad news for Black as the white rook now has threats of checks along the 7th rank. 20...Rd6 21.Rc7+ Kb8 22.Rc6!The final rook trade offer that makes this decisive. 22...Rd5+ 23.Kb6 Rd2 24.Rxg6 Rb2+ 25.Ka6 Kc7 26.Rg5 Rb3 27.Rxh5 Rxg3 28.Rxf5 Rh3 29.h5 Now the black rook can't be everywhere at once. 1–0.
Send questions and comments to PTamburro@aol.com.