
White to Play
Published in Chess Puzzles
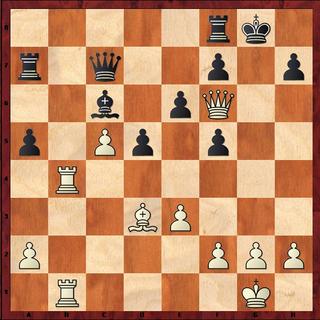
In doing our Monday Summer School lesson, we look at the benefits for the attacker when the opponent’s castled position is broken up. In the diagram we see that the g7 pawn probably captured on f6 and then moved to f5 to block the dangerous light squared White bishop. Notice also the nice little nesting place for the White queen. One last thing to note is that White’s rook on b4 was brought up there for a reason. White thought it important to have it up there. Why? Black’s last move was probably the pawn move to a5 to attack it and send it back, so he thought it was dangerous, too. See if you can use those three factors to create a team effort to mate Black.
Solution:
This was from Hort-Portisch, 1973 and continued with (always look at all checks!): 1.Rg4+ fxg4 2.Qg5+ Kh8 3.Qh6 and Black can’t stop the two mate threats at h7 and f8. White saw an obstruction, but, because of the big hole in Black’s position, removed it with the rook check and cornering the king with the queen was easy.
Send questions and comments to PTamburro@aol.com.