
White to Play
Published in Chess Puzzles
We’re coming to a close of our several weeks venture into learning how attacks start and are implemented. We’ve learned that you need to develop a sense for figuring out when the time is right, even though you can’t perhaps see a mate in two or three.
You’ve also learned that there are commonly occurring factors that tell you when to start: you can break up the castled king’s pawn structure, you can take advantage of weak squares in his castled position, you can often sacrifice a piece to help your access to your opponent’s king and you can get that king into the open and forced up the board to make it easier to get at him.
Hopefully, you’ve also learned to look at moves your opponent may play that don’t cooperate with your expectations.
Today’s position is from a game played by one of the greatest attacking players of all time—Kurt Richter. It’s stunning in its conception. You probably won’t see it all, but neither did I when I first saw. That doesn’t matter. What matters is that you learn from playing it over and then store the ideas for later use. Oddly enough, I used one of the ideas in this game just last night at a friend’s house. It was a five-minute game, and seeing the idea appear meant I didn’t have to think much with the clock ticking away. Good luck with this. Remember the rules we always give here and then work out as best you can.
Solution:
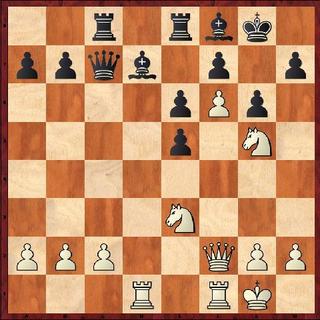
Here’s the whole game. For many of you who are tournament players, you probably are familiar with the Yugoslav Attack against the Dragon and have no idea that White used to use other attacks like the one used by Richter here. So, it’s instructional on a lot of levels. Richter,Kurt Paul - Engels,Ludwig [B73] Bad Saarow Bad Saarow 1937 1.e4 c5 2.Nf3 d6 3.Be2 Nc6 4.d4 cxd4 5.Nxd4 Nf6 6.Nc3 g6 7.0–0 Bg7 8.Be3 0–0 9.Qd2 Ng4 10.Bxg4 Bxg4 11.f4 Bd7 12.Rad1 Rc8 13.Qf2 Na5 14.f5 Nc4 15.Nd5 Nxe3 16.Qxe3 Re8 [16...Bxd4 17.Rxd4 Rxc2 18.Qh6] 17.Qf2 e6 18.Ne3 [18.f6 exd5 19.fxg7 Qe7 20.exd5 f5] 18...Kh8 19.f6 Bf8 20.e5 dxe5 21.Nf3 Qc7 22.Ng5 Kg8 [22...Bb5 23.c4 Bxc4 24.Nxc4 Qxc4 25.Nxf7+ Kg8 26.Nxe5]
See Diagram
23.Nxh7!! Kxh7 [Black could try something else, but the result is the same: 23...Bc5 24.Ng5 Qb6 25.Rd3 Bxe3 26.Rxe3 Rc4 27.Qg3 Qd4 28.c3 Qg4 29.Qxe5 Bc6 30.Rg3 Qh5 31.Nxf7 Kxf7 32.Qc7+ Kg8 33.Qg7#Did you consider this Black alternative when considering Nxh7?] 24.Qh4+ Kg8 25.Rf3 [The "rook lift" idea is crucial to kingside attacks. It's not just always from the f-file, either. In some openings where a4 is played early in the game, White will when appropriate to a king side attack, play Ra3 to slide the rook over to h3. ] 25...Bg7 26.Rh3 Kf8 27.Qh8+ [Black Resigns as it is mate in one:] 27...Bxh8 28.Rxh8# Capture, check, rook lift…bang, bang, bang! Then the mating combo! Now you should have a better idea of how to get to those mating positions.
Send questions and comments to PTamburro@aol.com.